Self-hosted Obsidian-powered website
This guide is intended to detail how I created this site.
I read a few assorted guides detailing various methods of putting Obsidian notes on websites, with various levels of involvement, but I never really quite found one that I was able to cram into my workflow. A good example of this is the Public Second Brain article on ssp.sh.
I almost discarded the Obsidian Digital Garden plugin entirely, because it is not designed for use with a custom web host -- only Netlify and Vercel. However, with some reading, some support from the community, and some trial and error, I was able to make it work.
Requirements
- Obsidian, and some notes to publish
- A GitHub account
- An ssh/rsync-capable web server
- At least vague knowledge about ssh keys and pipelines
Steps
Some of this list is heavily based on Digital Garden's Getting Started docs
- Log in to your GitHub account, or create one
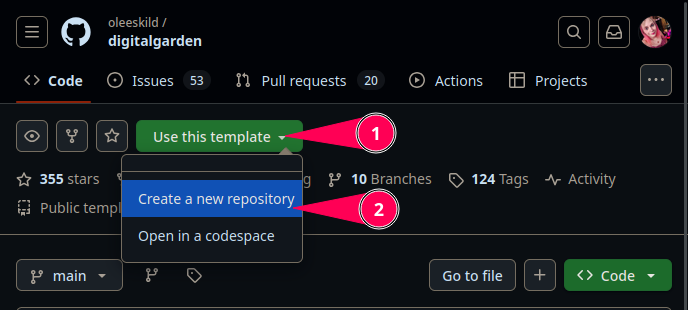
- Open this repository and click Use this template, and then on Create a new repository
- Install the Digital Garden plugin in Obsidian
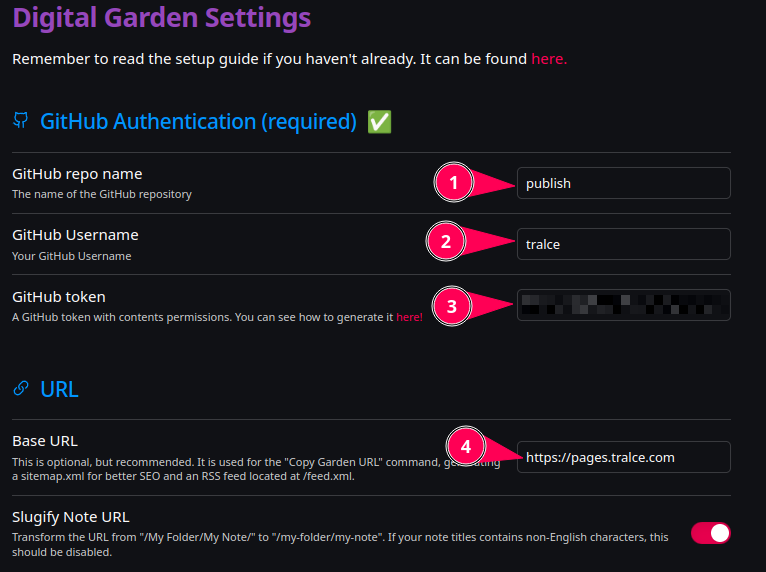
- Generate your Fine-grained access token in your new repository per the Digital Garden docs
- Populate at minimum the marked settings:
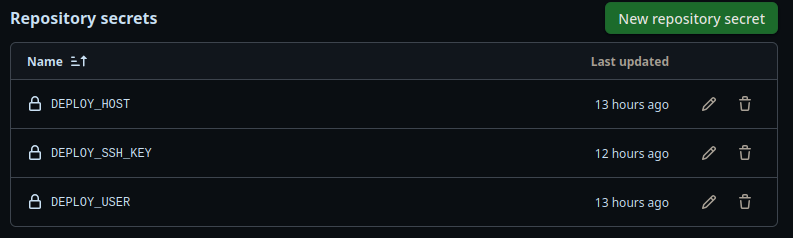
- Click on the Settings button in your repository, then on Secrets and variables, and finally on Actions, and create Repository secrets for
DEPLOY_HOST(the hostname or IP of your webserver)DEPLOY_USER(your username that you ssh into your webserver with)DEPLOY_SSH_KEY(The Private half of a keypair that is able to ssh into your server)- Switch to the Variables tab and create a Repository variable called
SERVER_PATHcontaining the location of your web data

- Click on the Actions tab in the top bar, then on New workflow, then set up a workflow yourself and paste this yaml into the editor and click Commit changes
name: Deploy website

on:
  push:
    branches:
      - main

jobs:
  build:
    runs-on: ubuntu-latest
    steps:
    - uses: actions/checkout@v4
    - uses: actions/setup-node@v4
      with:
        node-version: '22.x'
        cache: 'npm'
    - run: npm ci
    - run: npm run build
    - uses: burnett01/[email protected]
      with:
        switches: -avzr --delete
        path: dist/
        remote_path: ${{ vars.SERVER_PATH }}
        remote_host: ${{ secrets.DEPLOY_HOST }}
        remote_user: ${{ secrets.DEPLOY_USER }}
        remote_key: ${{ secrets.DEPLOY_SSH_KEY }}
Be absolutely certain that you populated SERVER_PATH correctly -- if it isn't, you could very easily accidentally delete everything on your webserver!
- Once this is all wired up, you should be able to configure and use the Digital Garden plugin as intended (on the Obsidian side) -- all publish actions will trigger this pipeline, which will generate the static website, and place it in a location on your server.
Sites generated by Digital Garden do not seem to do well when not placed at the root of your domain -- that is, it doesn't like to be in a subfolder. For me, tralce.com/pages did not work nicely, but pages.tralce.com did. I'm sure there's a solution out there somewhere.
Now, on to fixing problems
Dependencies
I did run into some dependency issues. I'm not sure if the process I followed was the correct one, but it did work, ultimately.
- I merged all of Dependabot's PRs from oldest to newest
- I clicked the Update Site button in Digital Garden's settings, which created a new PR, which I then merged
- I ran into build issues, so I cloned my repo locally and ran the following, which fixed the build issue
npm ci
npm audit fix
git add -u && git commit -m "npm audit fix" && git push
Character encoding
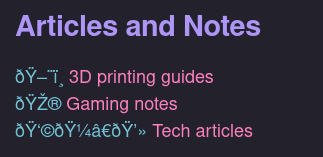
I also ran into an issue where, if I placed emojis on my pages, an encoding issue broke the emoji and caused garbled characters to appear.
This, in Obsidian:
would appear like this on the web:
I was able to solve this by cloning my repository, editing the following files, and adding <meta charset="utf-8" /> immediately after <head>.
src/site/_includes/layouts/index.njksrc/site/_includes/layouts/note.njk
<!DOCTYPE html>
<html lang="{{ meta.mainLanguage }}">
  <head>
    <meta charset="utf-8" />
I also created a .htaccess file, and populated it with AddDefaultCharset utf-8, though I'm not convinced that did anything.